Thursday, October 30, 2014

Merida Scultura 5000 - Tools and Accessories

After getting my new Merida Scultura 5000 road bike, it is time to add some accessories to the bike! As I want this bike to be a lightweight road bike, it would be best to minimise the amount of additional weight due to tools and accessories. However, some tools are essential, such as a small hand pump, tire levers and a spare tube.

There are a few ways to carry tools on a road bike. By far the most common is to use a rear saddle bag, but it can be kind of bulky (even the small ones) and spoils the streamlined look of the road bike. An alternative way is to get a top tube mounted bag which rests on the top tube, just behind the stem. However, I find that I will hit the top tube bag when I move down from the saddle during a stop, so that is out of the question too. Some riders will put spares in the back pockets of the cycling jersey, but I am always afraid that the items will drop out too easily.

Finally I decided to use one of the water bottle cages to hold the tools and spares. You can always use an old water bottle to hold the stuff, but I wanted to get a nicer looking tool bottle that can be used to store tools. Although this occupies one of the water bottle cages, leaving only one for the actual water bottle, I feel that this should be enough for most of the rides I do. On longer rides where I will need two water bottles, I will probably put the tool bottle in the backpack.

The two water bottle cages on the Merida frame. One will be used for the tool bottle!

This is the Large sized tool bottle...

...and this is the Small sized tool bottle. What is the difference? Let's find out!

They are similar in circumference, and only differ in height. The small tool bottle is about 133mm in height, while the large tool bottle is about 183mm in height.

I first tried the small tool bottle, but it does not fit tightly in the bottle cage. The catch on the bottle cage is higher than the tool bottle, and the bottle's circumference is slightly smaller than the bottle cage.

The large tool bottle has a depression at the side which is meant for the catch, however it is unable to fit securely.

To get the large tool bottle to fit, I turned the tool bottle around such that the catch on the bottle cage pushes against the flat side of the tool bottle. This creates some interference which fits the tool bottle snugly in the bottle cage.

After some trial and error, I found that all my tools can actually fit in the small tool bottle. However, the small tool bottle cannot be securely fitted to the bottle cage, which is why I decided to use the large tool bottle.

As the tools are unable to fully fill the large tool bottle, they will rattle in the empty space in the large tool bottle. My solution is to fit in 2 pieces of lightweight foam to fill up the space at the bottom of the tool bottle, before putting in the tools. This is kind of silly as the extra space is wasted, but I can't think of a better way for now, apart from stuffing in more tools?

2 x foam blocks are first placed into the large tool bottle. This takes up the extra space in the bottle, and also provides a soft layer to prevent the tools from rattling against the bottom of the tool bottle.

The weight of the empty large tool bottle + 2 pieces of foam inside.

The large tool bottle with all my selected tools and spares! This means that the tools and spares weigh about 400 grams.

The full complement of tools and spares in my tool bottle

Items in my tool bottle:
1) 2 x cable ties. Weigh next to nothing, but useful for tying up loose stuff or cables if they are broken or loose. A roll of tape will also work.
2) Topeak Mini 9 Multi Tool. Bare minimum of tools to adjust and tighten bolts and screws on the bike.
3) Topeak Universal Chain Tool. Necessary if you ever need to fix a broken chain.
4) 11 speed KMC Missing Link (spare quick release chain links). Quick and easy way to fix a broken chain by removing the damaged link with the chain tool, and installing these Missing Links by hand.
5) Schwalbe Tire Levers. Best tire levers for removing tight tires from the rims.
6) 700x18/25C spare tube
7) Park Tool Emergency Tire Boot. Used to patch a torn tire if sliced through by sharp road debris. Different from a tube patch.
8) Park Tool Super Patch Kit. Comes with sandpaper for scuffing the tube and some pre-glued patches for fixing the hole in the tube. Only will be used if the spare tube also gets punctured.
9) Some cash for buying food and drinks, and for taking the taxi home if all else fails
10) Lezyne CO2 Trigger Drive, for quick inflation of a flat tube to the correct high pressure.
11) Lezyne Pressure Drive hand pump (not shown). Just in case the CO2 cartridge fails.

That is a pretty long list of spares and tools! Some may be redundant, but it is better to be safe. If I were to trim down the list, I would remove the Lezyne CO2 Trigger drive and depend solely on the hand pump. The emergency tire boot, patch kit, KMC Missing Link and cable ties can also be removed, but they are so lightweight that there is no reason not to carry them.

The other tools and spares are absolute essentials for me. Multi tool, chain tool, tire levers, spare tube and hand pump are the minimum that I would carry on this road bike.

So how does everything fit into the tool bottle? It is important to fit everything snugly so that there is no space for the tools to rattle about in the tool bottle.

Managed to squeeze everything into the tool bottle. The multi tool (not shown) will be placed on top since it will be the most frequently accessed.

The tool bottle fits nicely into the bottle cage and looks well integrated with the frame. No extra bags hanging around the bike!

Other than the tools and spares, the other accessories would be the front light, rear light and the cycle computer.

For the rear light I am using the Bontrager Flare 3, which was originally mounted on the rear rack of the Dahon Boardwalk.

Bontrager Flare 3 rear light mounted on the seat post.

There are a few accessories on the handlebar which I want to use, so it was quite tricky to arrange everything such that they fit on the narrow drop bar, and yet don't interfere with my hands when holding the top of the drop bar.

Since there are no bags on the bike to hold my mobile phone when I am riding, I had to mount a Topeak Smartphone DryBag on the drop bar. This bag is rather big and takes up one whole side of the drop bar. This leaves only the other side of the drop bar for the cycle computer and the front light.

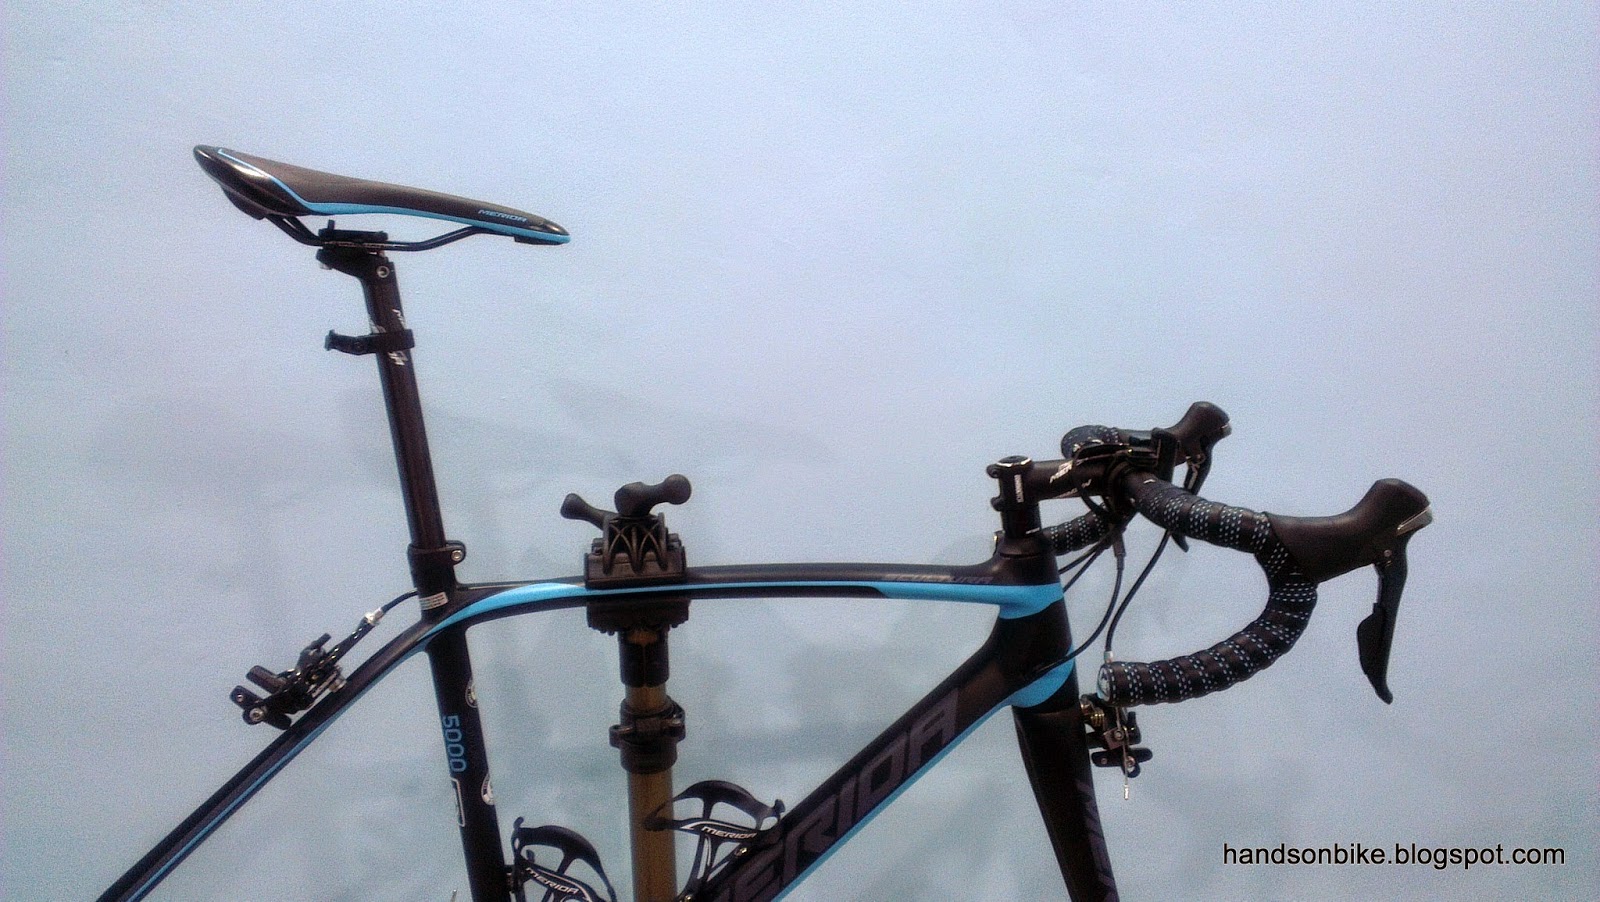
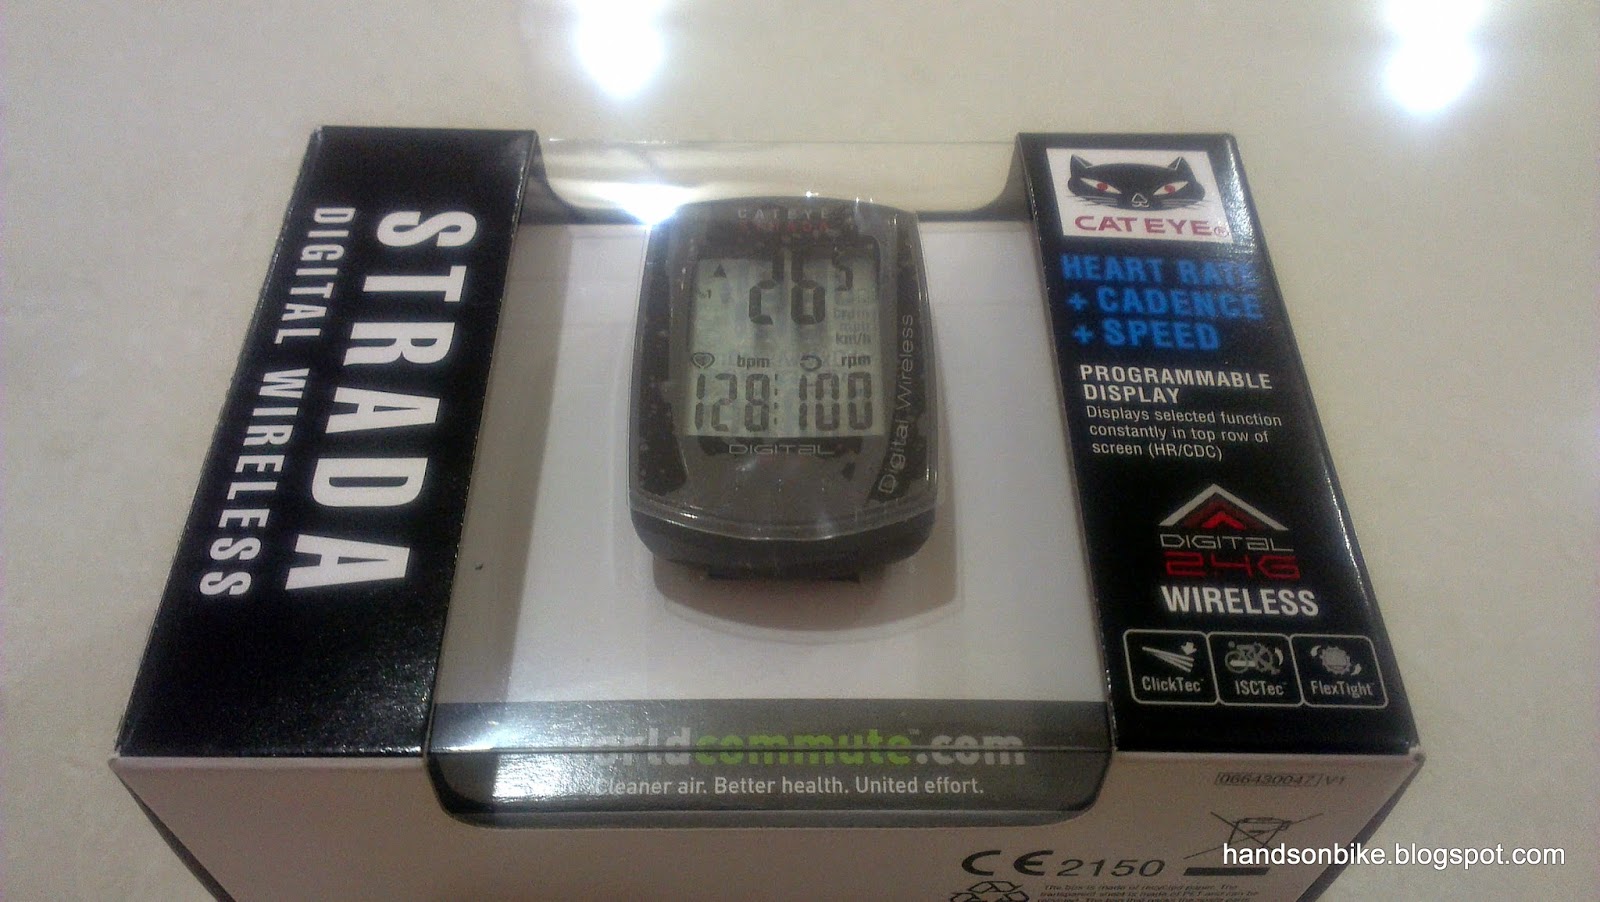
For the other side of the handlebar, I had to get another of the Bar Fly Bracket for Cateye cycle computers, so that the cycle computer can be moved to the side. This also puts the cycle computer closer to the side so that it is easier for me to reach the cycle computer with my hands. The cycle computer that I am using is the Cateye Strada Digital Wireless.

Lastly, the front light that is on this road bike is the slim Moon Comet front light. I just took one of the two Moon Comet front lights that are on the Dahon Boardwalk and installed it on this bike.

Managed to fit everything nicely on the drop bar!

The Topeak bag is large but necessary for holding the phone.

With the large Topeak bag removed, the handlebar looks much neater. 

Overall view of the bike with the tool bottle and the lights installed. The rear light kind of sticks out like a sore thumb, maybe I will change it to a rear light with a lower profile...

Update:
After getting some new bottle cages, I can now use the small tool bottle on the bike as they fit nicely into the new bottle cages. Click on the link below to find out.

Merida Scultura 5000 - Colouring the Bike

Sunday, October 26, 2014

Merida Scultura 5000 - Stock Component Weights + New Saddle

Here is the second post about my new road bike, the Merida Scultura 5000! In the previous post about the bike I wrote about the first impressions that I got from the bike. After spending more time with the bike, I have started to look more in-depth into every part of the bike and found more interesting highlights.

Under the left chainstay there are actually 2 screw bosses that are currently covered with 2 bolts. These screw bosses are actually meant for mounting the Shimano Di2 battery, if you want to convert the bike to an electronic shifting setup. You can see how the Di2 battery mount is fixed to the frame using 2 M4 bolts at this post here.

The 2 M4 bolts located under the left chainstay, near the BB area. This is for the Di2 battery mount.

As a full carbon frame, the dropouts are also fully carbon to save weight, as compared to using aluminium insert dropouts on the frame and fork.

Thick and chunky rear dropout in full carbon

Full carbon front fork dropout

While cleaning the bike, I also took the chance to get a closer look at the rear hub and cassette. Since the wheels are already off the bike I might as well clean the cassette too.

The bike with both wheels removed for some post-rain maintenance.

11 speed compatible freehub body. Nothing too special, feels like s standard rear hub that feels rather heavy.

Shimano 105 5800 11 speed cassette, 11-28T. The cassette and chain are of 105 level instead of Ultegra to cut cost and make it possible to reduce the bike price.

Closer look at the cassette sprockets and the number of teeth on each gear sprocket.

In case you are wondering, the Shimano 105 5800 11 speed cassette in 11-28T weighs 274 grams. For comparison, the Shimano 105 5700 10 speed cassette in 11-28T weighs 251 grams.

Next, let's move on to get a closer look at the seatpost. The stock seatpost is actually a nice carbon seatpost that looks pretty expensive. How heavy does it weigh? Let's find out.

Small diameter of 27.2mm allows some flex that improves comfort.

Seatpost carbon tube with wall thickness that looks quite strong

Carbon seat tube with aluminium seat post clamp

After pulling out the seat post, I realised that the seat post is actually very long! There is a minimum insert length of about 10cm. Even if I cut off 10cm from the seatpost, I still have sufficient length to get another 10cm of insert at my saddle height.

The long seatpost when inserted at the minimum insert length. 10 cm of the seatpost is actually still in the frame.


The stock Merida seatpost weighs about 266 grams, which is actually quite low considering the long length, and that it comes stock with the bike.

I estimate that if I cut off 10cm from the seatpost, the weight can be reduced by 50 grams. A small difference that is probably negligible. The majority of the weight is actually concentrated in the aluminium clamp at the top of the seatpost. Other carbon seatposts of comparable weight will cost many times more than this stock Merida seatpost.

Besides the seatpost, let's take a look at the stock Merida saddle. It is quite a decent looking saddle that has matching colours with the bike frame.

The stock Merida saddle weighs 336 grams, which is considered rather heavy for a road bike saddle.

I decided to change the stock Merida saddle to a more familiar saddle, the Selle Italia SLS KIT Carbonio Flow saddle, which I am also using on the Dahon Boardwalk. The appearance looks a little different due to the different printing design, but the saddle is the same. There is also a 100 grams weight saving over the stock Merida saddle.

Selle Italia SLS KIT Carbonio Flow saddle, weighing only 233 grams. Saves 100 grams over the stock Merida saddle.

The 2 saddles side by side. The Merida saddle is longer and also wider. The Selle Italia saddle has a cutout in the middle which definitely contributes to the weight difference.

Another part of the bike which I weighed is the bottle cage. There are actually two bottle cages on the bike which were given free with the purchase of this bike. These are nice alloy bottle cages which fits very well visually with the rest of the bike frame.

A pair of Merida water bottle cages! It would be perfect if the white Merida logo was in sky blue colour instead to match the frame colour perfectly.

Weight of the alloy Merida bottle cage is only 30 grams. This is of similar weight to carbon bottle cages that cost many times more than this.

I was also curious about the weight of other stock Merida parts, such as the stem and the handlebars, so I did some research to find out the weight. It was too troublesome to remove everything from the stem and handlebars to weigh them.

The Merida stem that comes with a carbon faceplate. How much does it weigh? 

I found this stem on Taobao that looks very similar to the one on my bike. It also has a carbon faceplate. The stated weight is 132 grams for a 110mm stem. 

Since my stem is a 100mm stem (I think), it will weigh slightly less than 130 grams. This is an excellent weight for a stem, regardless of whether it is made of aluminium or carbon. A fantastic piece of stock equipment that is of good quality, giving me no reason to change out the stem at all.

I also wanted to check out the weight of the stock handlebar. This is a FSA Gossamer Compact drop bar that is 400mm in width (I checked the spec by removing the faceplate on the stem). According to the FSA website, a 420mm wide drop bar will weigh 310 grams. This means that the 400mm wide drop bar that is on my bike will weigh about 300 grams.

Not the lightest, but the compact shape is exactly what I like. I had also changed to a FSA compact drop bar on my Dahon Boardwalk, to improve the comfort and reduce the drop distance.

FSA Gossamer Compact drop bar comes stock on the Merida Scultura 5000 road bike.

With that, I pretty much know what to upgrade on this bike, and what to leave alone. The stem and seatpost are of good quality and it is probably not worth changing them just to save a few grams. The handlebar is slightly heavier than comparable carbon drop bars, but the compact shape is nice and I will probably keep it.

The saddle has already been changed to save 100 grams and improve comfort (the stock saddle's nose was too long and keeps catching the back of my cycling pants when I start off). The weight weenie in me has somehow re-surfaced after I got this road bike. There are other upgrades that are lined up, and will be revealed after I make the changes. These upcoming upgrades are pretty interesting and will definitely cut more weight off the bike. Find out soon!

Saturday, October 25, 2014

Cateye Strada Digital Wireless - With Heart Rate and Cadence Sensors

One of my main reasons for getting a road bike is to try and see how different it is compared to my road-bike-like folding bike, the Dahon Boardwalk. Besides the general feel when riding the bike, it will be useful to have some form of measurement, such as the cruising speed or max speed on these two different bikes.

Therefore I needed to get a new speedometer for my Merida Scultura 5000. With the wide variety of options available in the market, there is no shortage of good speedometers or cycle computers. The difficult part is choosing which is suitable for you, and what features you are looking for in the cycle computer.

In my opinion, Cateye is the current market leader for cycle computers. They have many different models of cycle computers to suit different riders and price points, and they are always reliable.

Garmin is another brand that is rapidly gaining market share in the cycle computer market. The main draw of Garmin computers is the ability to link up to the phone or internet, and to locate or navigate using the in-built GPS. The large amount of data available makes it super useful for training, where numbers and statistics are important. The downside is the high cost of owning a good Garmin computer. At the entry level there is the Garmin Edge 200, with very basic functions, which is available for about $150. Those who want good connectivity and additional sensors can look at the Garmin Edge 510, which costs $450 locally inclusive of the cadence, speed and heart rate sensors.

Due to the high cost of the Garmin cycle computers, I decided to get a cheaper Cateye cycle computer instead. This model does not have GPS, which I don't need anyway.

Cateye Strada Digital Wireless CC-RD430DW. This model includes the cadence/speed sensor and a heart rate monitor chest strap.

The standard functions of a Cateye cycle computer are all there. Additional features include a 2.4Ghz wireless frequency for lesser interference.

Comes with cadence/speed sensor and HR sensor

The model number of this Cateye cycle computer.

Chest strap with HR monitor unit

Cadence/speed sensor with rubber mount and cable ties

This unit will be mounted on the chainstay for measuring both the cadence (using the crankarm) and the speed (using the rear wheel).

The parts of the cycle computer. Magnets (crankarm and spoke) are shown in the bottom left corner.


Magnet for the spokes shown on the left, magnet for the crankarm shown on the right.


The computer unit. This page shows the speed on top, the heart rate at the bottom left and the cadence at the bottom right. This configuration can be modified.

The reset buttons of the different sensors

Using 2.4 Ghz will avoid interference from other cycle computers and bicycle lights, but may be prone to other sources of interference such as Wi-Fi or microwave ovens that operate near this frequency range.

It is possible to use the cycle computer on two separate bikes, each with its own sensors.

The large sheet of instructions that are typical of Cateye cycle computers. Mostly confusing and difficult to interpret.

Installation of the sensors and cycle computers are easy, if you have set up Cateye computers before. If not, you will need to take some time to read the instructions carefully and figure out how to mount each part properly. I have installed Cateye cycle computers on 3 other of my bikes, so this is no problem for me.

The cadence/speed sensor is mounted on the left chainstay of the Merida road bike. The position is mostly determined by where you place the magnet on the left crankarm.

Use the rubber mount and the cable ties to fix the sensor securely to the left chainstay.

The long arm of the sensor detects the speed by reaching towards the spokes of the rear wheel.

Install the magnet on the spoke, at a position where it will move past the sensor. The sensor arm can also be adjusted if it is too far from the magnet.


For the magnet on the left crankarm, you can install it this way without using cable ties. Just stick the magnet directly to the spindle of the left pedal. 

I did not use the crankarm magnet that is provided with the package. In order to ensure that the magnet will stick securely to the pedal spindle, I bought some powerful neodymium round magnets (12mm) and stuck it to the pedal spindle. Since your spindle is made of steel (unless you use expensive pedals with titanium axles), the magnet will stick securely to your pedal spindle. It is very secure and will not drop off even when cycling over bumpy roads. This method eliminates the unsightly cable ties on the left crankarm.

With the powerful neodymium magnets, the cadence sensor can be located slightly further away and it will still work properly.

Cycle computer mounted on the handlebar

In order to make some space for the front light and my Topeak phone pouch, I actually went to get another Bar Fly Bracket for this new Cateye cycle computer.

Just sufficient space for the Cateye cycle computer, the Moon Comet Front Light and the Topeak Smartphone Drybag 5".

After testing it for a couple of weeks, here are some of my findings for the Cateye Strada Digital Wireless cycle computer.

Pros:
1) Small and lightweight.
2) One battery will be able to last 1 year, and does not need to be recharged frequently unlike Garmin units.
3) No interference by the Moon Comet front light, which will cause interference to the older Cateye Strada wireless cycle computer if placed too close to the computer unit.
4) Automatic linking of the cadence/speed sensors and HR monitor once the computer is activated by pressing the screen on the cycle computer.
5) One of the more affordable and reliable cycle computers that includes cadence, heart rate and speed sensors.
6) Simple one button operation

Cons:
1) No data logging by the computer. The cadence and HR that you see on the screen is the current reading, there is no way to record it against time or distance.
2) No backlight, which makes it difficult to read at night if the street lighting is dim.
3) No GPS for route logging or navigation.
4) No way to link or upload data to the computer.

In summary, this is a good cycle computer for those who just want to see data in real time, and don't need any post-ride data. The display shows the current cadence and heart rate which I find useful in helping me to control my efforts and achieve the target heart rate and cadence. As for those who want to record their cycling route or study the ride data after the ride, you will need to look at higher end cycle computers from Garmin, which will log down all the ride data for post ride study. Ultimately there are different cycle computers to suit different users and purposes.